
Note: All tools used are linked at the bottom of the post.
In this guide I will cover:
- How to extract content from the game and locate audio and video files
- How to convert the audio and video into viewable formats
Tutorial Index:
- Extracting the files from the game using DXMD Extract
- Browsing the contents of the extracted files using DEMDDatabase
- Convert unsorted audio files with HxD
- Extract unsorted audio files containing music layers with Game Extractor
- Extract specific audio (i.e. conversational dialogue) with DEMD Database
- Fix corrupted .ogg audio files with QuickBMS
- Convert unsorted video files (cinematics, loading screens) with HxD
- Extract and split audio tracks from .bk2 files with VGMToolbox
- Convert the audio streams using RAD Video Tools
- Convert the audio streams using VLC Media Player
- Convert the video stream using RAD Video Tools
- Combine the video stream and the audio streams using FFmpeg
- Final results
Extracting the files from the game using DXMD Extract
- Unpack the DXMDExtract archive and move DXMDExtract.exe to the installation location for the game,
for example, for the Steam version:
Main game: Steam\steamapps\common\Deus Ex Mankind Divided\runtime
DLC: Steam\steamapps\common\Deus Ex Mankind Divided\DLC\runtime

- In that same folder, create a new text file. Open it in a text editor, and enter the following
line:
DXMDExtract . .\extracted
Example:
- Save and exit, and then rename the file to unpack.bat

- Double-click on it, and then the Command Prompt will appear and begin to unpack the game

-
Once complete, the unpacked files should be in a subfolder within the runtime folder named extracted


Browsing the contents of the extracted files using DEMDDatabase
- Unpack the DEMDDatabase archive and run DEMD Database.exe
- File > Open > Open unpacked DB

- Navigate to the NameMap.txt file from the extracted folder created previously when unpacking with
DXMDExtract

- After loading, the file trees are now displayed graphically and can be browsed, for example if you’re
searching for conversational dialogue, you can expand the file list until you find what you need


Note: After selecting a NameMap, the software will automatically open that NameMap every time it starts, which becomes a problem if you want to load a different NameMap (either from the Runtime or DLC Runtime). To fix this, you need to either move the previous NameMap.txt to another folder or rename it to something like NameMap.old so the software can't open it anymore. It should then enable you to open a new unpacked DB. There is no way to merge the two NameMaps to generate a more complete file tree including both the base game and DLC content, unfortunately, so you'll have to switch between them when necessary.
Convert unsorted audio files with HxD
- Navigate to the runtime folder for either the main installation of Mankind Divided or the DLC runtime
folder. Here the audio and video files appear to be unsorted and scattered. Audio files have the extension
.pc_fsbm

-
Open the file you want to convert with HxD and remove the first 24 bytes of information (the header), until it starts with FSB


-
Save the file with HxD editor, this will automatically create a backup of the original .pc_fsbm file in the same folder
-
Rename the file and change the file extension to .fsb


-
As a .fsb file, it can now be converted to.wav using vgmstream or FSB Extractor - this is covered in detail in my other guide on extracting audio and video from Deus Ex: Human Revolution - the process is identical.


Extract unsorted audio files containing music layers with Game Extractor
A problem that can be encountered after extracting and browsing the file tree using DEMD DB is that there may be missing files. Files that NameMap.txt indicates should be in the path presented, i.e. Dubai music should be inside the Sound > Music part of the tree - but it doesn't show up.


The reason why this might be happening is that a lot of the game files are not actually located inside the main archive layers, but are just casually sitting around in the runtime folder.
The HxD method as demonstrated above may not work with most of the music ones because within the file are multiple layers of audio that will not magically downmix to one stereo audio file if we modify the header or file extension.
Luckily there is a tool available called Game Extractor that has recently been patched (version 3.16) to deal with these .pc_fsbm files more easily.
- Download and install Game Extractor, and run the tool.
- One open, you will see a file browser on the right panel; browse to your game runtime where all of the .pc_fsbm files are located. It may help to already copy all the .pc_fsbm files to a specific folder to work from if you don't want to clutter up the main folder.

- The browser should now list all the .pc_fsbm files. From this view you can double click one, and on the central panel, a new list will display of the file contents in .ogg format, which are music layers. With this information you will be able to find the missing files that were listed in the NameMap but not displayed in the DEMD DB file tree.

- You can extract the contents of that .pc_fsbm by clicking the icon at the top which looks like a floppy disk with a green arrow pointing at a file.

- After clicking the button, a section underneath the file browser on the right will appear, where you can input the extraction directory. To the right of that input field are two more buttons which look the same as before. The first one will extract the individual selected file from the archive only, and the second one will extract all files from the archive instead.

- Click the one you want, and the files should be saved inside the extraction directory you specified as .ogg files.

- Repeat the process for the other .pc_fsbm files you want to extract. As the music for some areas in the game are divided up into multiple layers (some more than others), you may have to import every layer and downmix them into one stereo file in an audio editing software like Audacity, similarly to how I demonstrated with the cutscene audio layers in this section


Extract specific audio (i.e. conversational dialogue) with DEMD Database
- For a more targeted approach, the NameMap.txt file that is generated from the DXMD Extraction comes in
useful as it lists every file and where they can be found within the file tree

- Opening it with a text editor and using the find function can help narrow down the search, in this instance
I was searching for a specific conversation, and in the .txt file it is called dlc_1_441_con. I was able to
find this easily in the file tree


-
It is possible to export the entire conversation in one go, but in order to do that the fast export savepath needs to be set first. To do this, go to File > Settings
-
In the Settings window, you can set the Fast export savepath under the Fast export tab. Save to commit the changes

-
Select the parent node for the conversation you want to export > File > Mass fast export


-
A dialogue box will appear when the process is complete

-
The audio files from the conversation have now been exported as .ogg can be found in the folder you added to the Fast export savepath


Fix corrupted .ogg audio files with QuickBMS
Some audio, upon extraction and conversion becomes corrupted, and sounds garbled and distorted when it is
played. This appears to be some kind of problem with DEMD Database failing to properly convert the .bin files
found within the .pc_headerlib files--which is where most the game audio is stored.
Why this happens is unclear, but it might have something to do with when the source file has multiple audio
layers and the conversion process is unable to produce a file that contains this layer information, or is unable
to produce a stereo mixdown of those layers (more on that at the end of this section).
To bypass this issue, we have to extract the audio a different way by using a QuickBMS script:
- Assuming you've already extracted the game files using the above instructions, and you have DEMD
Database set up to explore the extracted content, you need to find the problematic audio files again
in the file tree. You should have the names of the corrupted audio already from the failed
conversion, so just search for the name.

- After you find it, check the right panel for more information. The first line should display a long
string of numbers and letters, a forward slash and then another string of text followed by a .bin
extension. The second line displays the name of the file. We need the first line, as these strings
are pointing to a path to where the audio is actually located. The first section is the
name of the .pc_headerlib file the audio was contained within, and the second section the name of
the .bin file that contained the actual audio.

- In your game directory, go to the /extracted folder made earlier when extracting the game where the
NameMap.txt is located (either the default runtime or DLC runtime, in this case I've extracted from
the DLC). In this folder, you should be able to find a subfolder with a name that matches the first
section of the path displayed in the panel. Within that folder, should be the .bin file with the
audio. You can also use the search function and type the .bin names in manually to find the files.


- Depending on how many corrupted files you may need to repeat this process again, for me I had
multiple corrupted audio within the same dialogue "conversation", so all the .bin files I needed
were located within just one folder. I copied these .bin files to my Desktop so I could continue
working outside of the game installation files.

- Next you need to create a script file for converting the .bin files into .fsb audio files. You can
do this by opening up Notepad or any text editor of your choice, pasting this code in, and then saving it as a .bms file.

- Download and extract QuickBMS. In the QuickBMS folder, place the bin2fsb script and also make a
subfolder called extraction.

- Run QuickBMS.exe - when prompted, select the script you created, the input files (.bin files),
and the output destination (extraction subfolder) and continue. The progress will display for every
file selected as well as any errors.

- Once done, various .fsb audio files should have been extracted in the output folder set.

- To convert the .fsb files to .wav you need to use vgmstream. Download and extract vgmstream on your
computer, and either drag each of the .fsb files one-by-one onto vgmstream-cli.exe or create a batch
script, making sure to set the path to match where vgmstream-cli.exe is located on your drive, like
so:
FOR /R
%%a IN (*.fsb) DO "...\vgmstream-cli.exe" -l 2 -f 10 -o "%%a.wav" "%%a"

- To run the batch convert, first place all the .fsb files into the vgmstream folder, and then
double-click the .bat file.
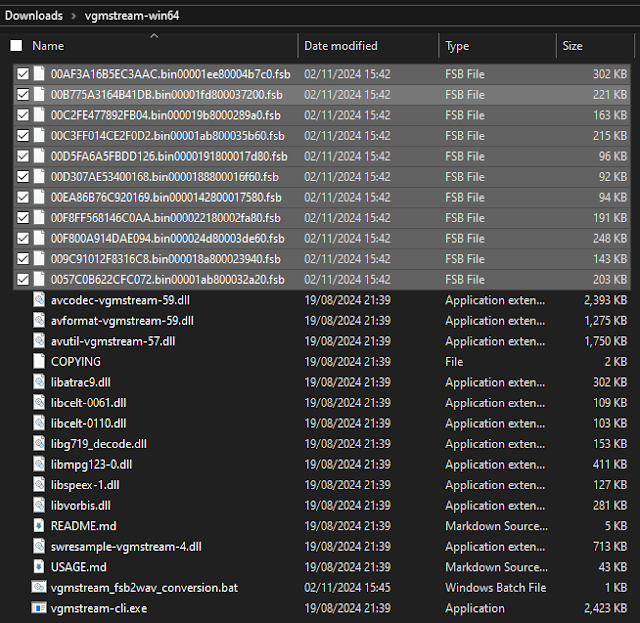

- The audio should now all be converted to playable .wav files in the same folder.

- This step is optional, but I found that it helped with organising, I renamed each of the .wav file
to match the corresponding name in DEMD Database.


- I opened one of the .wav files in Audacity to compare it to the corrupted ones. The properly
converted .wav files appear to have multiple layers of audio, the first two being the stereo channel
for the voice, the second two appearing empty, and the third two with environmental effects such as
reverb and echo. The corrupted ones are just one channel with various peaking blips and noise. Here
are screenshots of the difference:


- Assuming you've already extracted the game files using the above instructions, and you have DEMD
Database set up to explore the extracted content, you need to find the problematic audio files again
in the file tree. You should have the names of the corrupted audio already from the failed
conversion, so just search for the name.
- After you find it, check the right panel for more information. The first line should display a long
string of numbers and letters, a forward slash and then another string of text followed by a .bin
extension. The second line displays the name of the file. We need the first line, as these strings
are pointing to a path to where the audio is actually located. The first section is the
name of the .pc_headerlib file the audio was contained within, and the second section the name of
the .bin file that contained the actual audio.
- In your game directory, go to the /extracted folder made earlier when extracting the game where the
NameMap.txt is located (either the default runtime or DLC runtime, in this case I've extracted from
the DLC). In this folder, you should be able to find a subfolder with a name that matches the first
section of the path displayed in the panel. Within that folder, should be the .bin file with the
audio. You can also use the search function and type the .bin names in manually to find the files.
- Depending on how many corrupted files you may need to repeat this process again, for me I had
multiple corrupted audio within the same dialogue "conversation", so all the .bin files I needed
were located within just one folder. I copied these .bin files to my Desktop so I could continue
working outside of the game installation files.
- Next you need to create a script file for converting the .bin files into .fsb audio files. You can
do this by opening up Notepad or any text editor of your choice, pasting this code in, and then saving it as a .bms file.
- Download and extract QuickBMS. In the QuickBMS folder, place the bin2fsb script and also make a
subfolder called extraction.
- Run QuickBMS.exe - when prompted, select the script you created, the input files (.bin files),
and the output destination (extraction subfolder) and continue. The progress will display for every
file selected as well as any errors.
- Once done, various .fsb audio files should have been extracted in the output folder set.
- To convert the .fsb files to .wav you need to use vgmstream. Download and extract vgmstream on your
computer, and either drag each of the .fsb files one-by-one onto vgmstream-cli.exe or create a batch
script, making sure to set the path to match where vgmstream-cli.exe is located on your drive, like
so:
FOR /R %%a IN (*.fsb) DO "...\vgmstream-cli.exe" -l 2 -f 10 -o "%%a.wav" "%%a"
- To run the batch convert, first place all the .fsb files into the vgmstream folder, and then
double-click the .bat file.
- The audio should now all be converted to playable .wav files in the same folder.
- This step is optional, but I found that it helped with organising, I renamed each of the .wav file
to match the corresponding name in DEMD Database.
- I opened one of the .wav files in Audacity to compare it to the corrupted ones. The properly
converted .wav files appear to have multiple layers of audio, the first two being the stereo channel
for the voice, the second two appearing empty, and the third two with environmental effects such as
reverb and echo. The corrupted ones are just one channel with various peaking blips and noise. Here
are screenshots of the difference:


Convert unsorted video files (cinematics, loading screens) with HxD
- Before starting, you need RAD Video Tools (Bink Video Player) to play the videos after converting them. Download and install it, as you'll need it for the next section of this guide to convert the audio streams from the video.
- Navigate to the runtime folder for either the main installation of Mankind Divided or the DLC runtime
folder. Here the audio and video files appear to be unsorted and scattered. Video files have the extension
.pc_binkvid

-
Open the file you want to convert with HxD and remove the first 24 bytes of information (the header), until it starts with KB2


-
Save the file with HxD editor, this will automatically create a backup of the original .pc_binkvid file in the same folder
-
Rename the file and change the file extension to .bk2 (the icon should change)


-
The .bk2 files should now be able to play with RAD Video Tools (Bink Video Player)

Note: Due to localisation, audio streams, usually the voices, will not play and need to be extracted and split if you want to access them, as covered in the next section.


Extract and split audio tracks from .bk2 files with VGMToolbox
- Open VGMToolbox > Misc. Tools > Stream Tools > Video Demultiplexer > Options > set the Format
to BIK (Bink Video Container) > check Split Audio Tracks > check Extract Audio and Video

- Drag and drop the .bk2 file you want to extract into the grey area and it will automatically run with the
options set

-
Multiple files will then be extracted into the same folder the .bk2 file was in. The extracted files will have the file extension video.split.bik or audio.split.bik


Note: In the EU version of the game, layer 00000004 contains the English
voices, and layers 00000005, 00000006, 00000007, 00000008, 00000009, 0000000C, and 0000000D all have other European
localisations such as Spanish, German, Russian, etc. Layer 00000000 seems to have the main background music and
effects, 00000001, 00000002, and 00000003 have additional effects such as footsteps, etc.

Convert the audio streams using RAD Video Tools
- Open RAD Video Tools > navigate to and select every .audio.split.bik file you want to convert >
Convert a File > Yes to Batch Process dialogue box if you are converting multiple files


-
Within the Bink Converter window > change the Output Type to .wav > leave the other settings as default > click the Batch button on the right

-
The RAD Batch Editor window will then appear > click Close (might have to click this several times until all the files appear in the Batched commands list) > Start

-
The audio.split.bik files should now be converted to .wav files


Convert the audio streams using VLC Media Player
- Open VLC Media Player > Media > Convert/Save

-
The Open Media window will open. Click the Add... button > select the .bik file you want > drop-down arrow to the right of Convert/Save > Convert

-
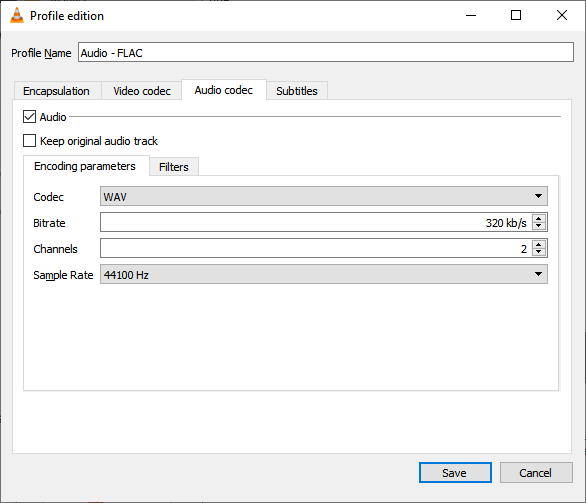
The Convert window will open. Under Settings > Profile drop-down > Audio - FLAC > profile edition (wrench icon)

-
The Profile edition window will open. Encapsulation tab > check WAV > Video codec tab > keep it unchecked (there is no video) > Audio codec tab > check > Codec - WAV, Bitrate - 320kb/s, Channels - 2, Sample Rate - 44100 or 48000 Hz > Save


-
Back in the Convert window set the destination path by clicking Browse > select folder you want to save the converted file (make sure to change the file extension to .wav in the save dialog) > Start

-
The .bik file should now be converted into a .wav file and can be found in your set destination folder


Convert the video stream using RAD Video Tools
- Open RAD Video Tools > navigate to and select the original .BK2 file you want to convert > Convert
a File

- Within the Bink Converter window > change the Output Type to .MP4 > leave the other settings as
default > make sure Audio is NOT selected > click the Convert button on the right

- A window will appear showing the progress of the conversion

- The .BK2 file should now be converted to an .MP4 file without audio


Combine the video stream and the audio streams using FFmpeg
Note: You can use FFmpeg (a command line interface program, instructions to install on Windows are
here) to add map
each audio stream as separate channels, but the problem with this is that a video player can only play one
channel at a time. If all channels are to play, an amix filter would need to be applied that will combine all
the channels into one track, for example:
ffmpeg -i INPUT1 -i INPUT2 -i INPUT3 -filter_complex amix=inputs=3:duration=first:dropout_transition=3 OUTPUT
But for the sake of simplicity, another way to do this without having to write up a complex command and enter
all the file names is to import all of the audio streams (i.e. all the SFX ones and ONE voice one depending
on the localisation you want) into Audacity, and then export all of them into one .wav file:


Then, with one video file and one audio file, you simply need to combine the two into one file using the
following command:
ffmpeg -i 2B4301F00CBF6612436EB95C599AAFC3.mp4 -i 2B4301F00CBF6612436EB95C599AAFC3_00000000.audio.merge.wav -c:v copy -shortest output.mp4
To understand the command, the video and audio are set as inputs (filename will be different depending on which files you are doing this with), it will copy the same codec settings to avoid quality loss, it will cut to the shortest stream length to avoid overrunning if the lengths differ, and the output name will simply be output.mp4:


When played, the video remains with a very high quality and all the audio
channels are audible in one audio track:

Results
Tools
- DXMDExtract:
https://sktest.aruarose.com/DXMDExtract_v002.7z - DEMDDatabase:
https://disk.yandex.com/d/qUxdTmJa3MxHEs - QuickBMS:
https://aluigi.altervista.org/papers/quickbms.zip - QuickBMS bin2fsb script:
https://gist.github.com/criminalelements/bbeea8faa8980eb652fe3a1e9b82e209#file-bin2fsb-bms - vgmstream (make sure the version you use is bundled
with foobar2000):
https://github.com/vgmstream/vgmstream/releases/download/r1951/vgmstream-win64.zip - HxD:
https://mh-nexus.de/en/hxd - GameExtractor (make sure you get release version 3.16 which has .pc_fsbm to ogg support):
https://sourceforge.net/projects/gameextractor - RAD Video Tools:
http://www.radgametools.com/bnkdown.htm - VLC Media Player:
https://www.videolan.org - FFmpeg:
https://www.gyan.dev/ffmpeg/builds/ffmpeg-git-full.7z
Great post! Helps a lot.
ReplyDeleteThanks, I'm glad it helped.
DeleteHow did you get DEMD Database to extract to ogg? I just get a 'convert failed' error and it stays a wavebank and there doesn't seem to be any option to tell it where the codec is or anything.
ReplyDeleteDEMD Database comes with codecs for .ogg already, please use the version I linked in the Tools section and not the -old version on GitHub. If you still have issues please tell me how I can reproduce the error, getting at the wavebank files is also useful depending on what you're trying to do.
DeleteDifferent User here, but I got the same issue. Would there be any troubleshooting / debugging steps I could try to gather some additional info? I tried the same files as you in the guide, Database only says "Can't convert" in the bottom-left corner, without an ogg output.
DeleteThanks for the assistance,
Ted
One issue is you may have not set the mass export path or edited the output settings before trying to export. Without it being set the DEMD DB fails to export.
DeleteIf the output settings are fine but DEMD DB still doesn't work, there are alternative ways to get the audio without using DEMD DB (which seems to constantly cause issues when it comes to extracting audio in particular).
I have included these methods in my guide under the "Fix corrupted .ogg audio files with QuickBMS" and "Extract unsorted audio files containing music layers with Game Extractor" sections.
Great tutorial! I encountered some issues while extracting ogg files - could you help out?
ReplyDeleteA a lot of the ogg files sound corrupted - upon playback they have mass distortions and crackling... Do you have an idea what might be happening? Initially thought it might be my codec, but I uploaded it to google drive and it gave me same outcome. Curiously this doesnt happen for smaller sound files which play fine.
Thanks!
Thanks for letting me know - I've updated the guide to include a workaround using a QuickBMS script to avoid corrupted audio. Looks like the problem was with DEMD Database failing to properly convert audio files that had multiple audio channels.
DeleteHello. Great work, most complete tutorial i've found. I have an issue. I extracted all Eliza Cassan voices in English. So good, so far. But im brazilian, i can play my game in brazilian-pt_BR (audio/text), but all dialogs under localization node shows only english localization. I installed game with only pt_BR localization (no english, italian, no other language). The dialogs not show under that node. If i install english content, ok for english dialogs. Can you help with this little issue?
ReplyDeleteSolved. I realized the problem was the extraction with DXMDExtract. Default is "en" localization. Looking at the file name Game.layer.1.pt.archive I added the option -locale pt. Deus Ex is my favorite franchise.
ReplyDeleteHow/where would one go about adding the -locale option to the archive? Requesting clarification on behalf of others who may be encountering a similar issue.
DeleteI can't find the loading scene where Adam is on the subway. Can you help me? I'm interested in two scenes: walking and exiting the loading screen. I spent three hours converting and digging through the files, but all I could find was the subway ride, not the walking scene when the state of emergency was declared in Prague.
ReplyDeleteI can't point you directly to the files you're looking for, as I'd be in the same situation as you, not knowing the filenames or where they are stored. This can be a problem using DEMDdb as the cutscene videos might not all be in the same locations on the tree, meaning it's easy to miss them.
DeleteIf you open up the NameMap.txt in a text editor, you can search for .pc_binkvid files - which should identify every video scene in the game (in the vanilla game there seems to be 420 entries in the list). You should be able to narrow down the list of files to convert by filename.
Unfortunately, there's no easy way to do this except converting them all, since they all seem to have different locations and naming conventions.