
Shoutout to Shadept for figuring out the process and
explaining it to me, and for cchr11 and Kalathan for providing the savegames. I
wouldn't have been able to write this guide without their help. Thank you!
Note: All tools used are linked at the bottom of the post.
Install DXVK .dll files
Invisible War needs to be rendered with Vulkan to be captured with RenderDoc. Luckily, there exists a Direct3D to Vulkan translation layer that can be easily installed.
- To do this, all you need is to download and extract the .zip file for DXVK. Within it should exist two different folders, 64bit and 32bit.
- Invisible War is a 32bit application, so you need to grab d3d8.dll, d3d9.dll and dxgi.dll from the 32bit folder, and then place them within the System folder in your game installation location.


Capture 3D assets with RenderDoc
- Open RenderDoc. Under the Program section, set the Executable path to DeusEx2.exe from your game installation location. The Working Directory will automatically be filled afterwards. If you don’t have this .exe file, please check the optional tools section below for help.


- Under the Capture Options section, check the "Capture child processes" box. This is necessary because IW opens new processes every time a level is loaded, causing the capture to stop.

- Click the Launch button and wait for the game to start. If the game launches with white text displaying on the top left corner that says “Capturing Vulkan”, then RenderDoc is successfully debugging the application

- Load a savegame with the specific model you want to rip. In this case I wanted Ava Johnson dancing, which appears at one of the game endings.Note: Due to the nature of the capture (it’s literally like a 3D screenshot), you ideally need the model, if it's a character, to be standing still and not animating. In this example, loading a savegame with Ava talking to the player using the holocommunicator would’ve been a better choice as she is standing still. When you capture, try to get the character you want to finish talking/moving animations first so they're in a normal position.

- Once the game is loaded position your camera onto the model, wait for the position you want, and either hit Print Screen or F12 to capture. It should display at the top left that a capture has been taken.
Note: F12 seemed to cause a bit of a problem in game as it's the quick-load button, and if you're doing this from the Steam version it might take a screenshot. If you have any screenshot software running that uses Print Screen, it's probably best to turn it off so it doesn't interfere with the capture process. - The RenderDoc captures are stored by default (unless you saved them elsewhere) in your User folder > AppData > Local > Temp > RenderDoc. Load the capture you want into RenderDoc via File > Open Capture > select the .rdc file via the file browser. You may need to do multiple captures and load them to check each time if you’re struggling getting the character in the right position.


- When the capture is loaded, select the Texture Viewer tab so you can view snapshot of the screen when you took it. On the left is an event timeline that contains all the rendering steps that were saved from the capture, each assigned an EID (Event ID).

- You can expand ColourPass1 and ColourPass 2 to cycle through them. There can be hundreds of steps, so be patient. If you have difficulty interpreting them, you can go back into the Texture Viewer output and it should grey/blacken out the area on screen that graphical asset was associated with.


- If it's a character, the mesh is usually divided on different EID steps, one for the body, one for the head, and sometimes one for the eyes (not all character meshes have eyes for some reason). I didn't confirm this but it's likely any items the character was holding would be a fourth step following the character model. The character meshes tend to have larger numbers in the brackets compared to general environment geometry, listed beside the vkCmdDrawIndexed events.


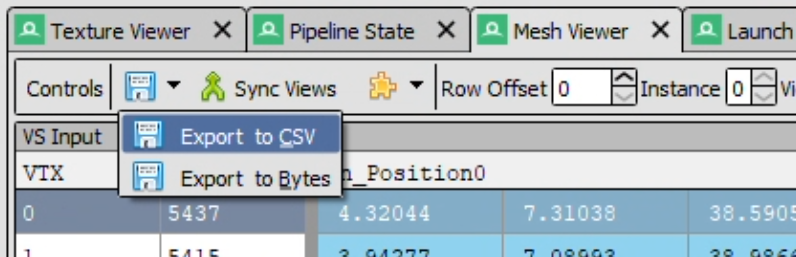
- Once you find the asset, go into the Mesh Viewer tab where you will be able to view, rotate, zoom it within the preview panel to confirm it’s the one you wanted. Finally, you can export the selected mesh as .csv. Click the floppy disk icon to save it as .csv, and do this for every relevant mesh part.


Install the Import CSV Blender add-on
- Open Blender, and then open the Preferences (Edit > Preferences). Within the next window, click Add-ons on the left, and click the downwards-pointing arrow at the top right. There, the Install from Disk option comes up. In the file browser, select the ImportCSV.py file that was in the GitHub .zip file. Once loaded in Blender, check the box to enable the add-on.


- Now you should have the option to import .csv files under File > Import > Mesh CSV (.csv)


Prepare the .csv file for Blender

This is because the add-on requires the import settings to match the .csv column layout. 2 columns are responsible for the coordinate positions and they need to match with the numbers. By default, the program sets column 14 and 15, but this may not always work. These values can be modified within the Operator Presets panel in the import window, but first you need to find the correct values.


- To check, open up the .csv in a spreadsheet program. There should be 32 columns, but not all of them are helpful.

- To fix the UV issue, you need take note of which columns are associated with the Texcoord positions (out_Texcoord0.x and out_Texcoord0.y respectively). For me, it was column 13 and 14 instead (column M and N). I've numbered the columns below and highlighted the important columns - column A = 0 so count from 0 from left to right to find which column you need.

- Another way to avoid this is before import, opening the .csv files, removing any columns that are full of just 1s and 0s as they're probably not being used, and making sure the Texcoord columns match up the with numbers in the import settings. For example, doing this changed my UV 1 values from 13 and 14 to 6 and 7 within the import settings.
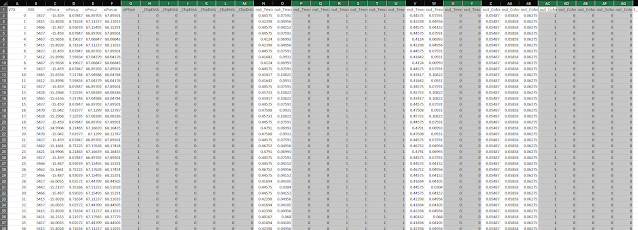


- You can also manually set the Vertex Color RGB values too so the importer knows what columns to read for everything, by changing the value to 1 and then inputting the three (out_Color0.x, out_Color0.y, and out_Color0.z) column numbers (for me they were 10, 11 and 12). Repeat these step for every meshpart you need to import.

- In Blender, the mesh parts will be imported blank white. i.e. without a texture. It will also appear vertically stretched (similar to the UE1 Blender importer process), to fix this you'll need to Z scale every mesh part you import by 0.6, just make sure not to move the meshes from their original import positions so all the mesh parts will align properly.


- To see textures on the model, you will need to change the viewport render mode to Material View, and you will have to create materials for each of the mesh parts and load a Diffuse map Image Texture in (and also the Normal map if you want that too). You can get the textures for each model by extracting them (please check my other tutorial if you want to know how to extract textures).
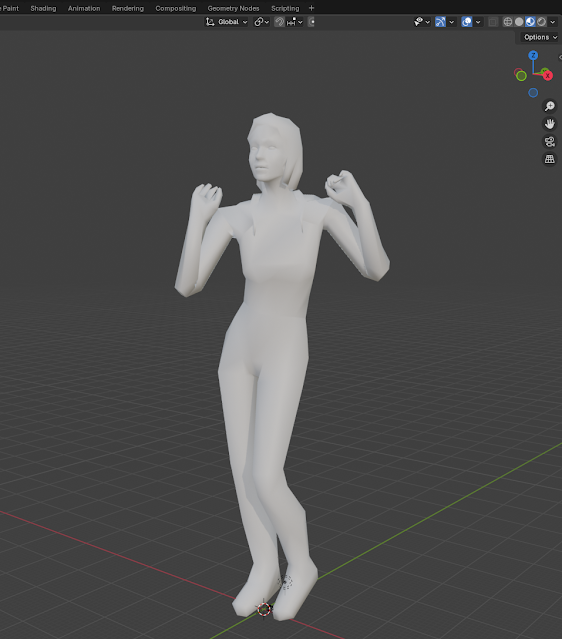


- If you open the UV Editor you can see the coordinates are accurate on the textures as well.

- If the mesh is unusually shiny/glossy, it might be the IOR level, you can reduce it by expanding the Specular panel (under the textures panel) and reducing the IOR level to 0.000


- Once everything is applied you can export this as an .obj or any format you like, as long as the .mtl file points to the texture locations. Here's an example of what it looks like when opened in XNA Lara:


Note: The mesh will be in the exact position you captured it in; there are no imported animations or skeletal bones. You can rig the model if you want, however that goes beyond the scope of this guide and I'm sure there are plenty of resources available on the internet that explains it better than I ever could, if you need help.
This process is technically much easier than any other extraction I've encountered which often require many kinds of conversions until we can get a workable mesh out of it, where even then the UV map can be lost or something else is missing. It is quite possible that this method can be used for all the Deus Ex games (or any game for that matter). For example, I tried this method with Human Revolution Director's Cut to see if it is possible to work-around the UV coordinate issue I ran into with direct conversion. It didn't need the dxvk translation layer, as RenderDoc can capture it directly via the Direct3D 11 API.
This also opens up a lot of future possibilities for game asset ripping. Its flaw, however, is relying on a translation layer in the way described in this instruction guide, if there is no support for the game in question (the game must be running Vulkan, D3D11, OpenGL & OpenGL ES or D3D12). I also ran into a capturing issue when trying this method on an emulated PS2 game using PCSX2, as it is possible to change the default renderer in the settings (I used Vulkan). When capturing, the 3D assets would churn out 2D projections instead, failing entirely to actually capture the steps involved so the entire screen is rendered in just one pass, making it impossible to break down the behind-the-scenes working to find a particular mesh.
A similar tool has existed for years, called NinjaRipper, but its latest version is currently behind a Patreon paywall and thus not accessible for everyone. There is a much older free version floating around on gamebanana, but I don't know how different it is from the Patreon one. There was also no way to confirm it would work for this, so I didn't see the point in paying for it unless I could test it first. Even so, I would never recommend paid tools.
Tools
- DXVK:
https://github.com/doitsujin/dxvk/releases/download/v2.5.3/dxvk-2.5.3.tar.gz - RenderDoc:
https://renderdoc.org - Spreadsheet software:
For this guide, I used Microsoft Excel. If you don’t have access to that, there are multiple free alternatives online. You can also import the .csv files into Google Sheets to make edits, and then export again in the same format. Trying to edit the comma-separated values in a plain text editor is not recommended. - Blender (Latest Version):
https://www.blender.org/download - Puxtril’s CSV import Blender Add-on:
https://github.com/Puxtril/CSV-Import
Optional Tools
- Deus Ex 2 Visible Upgrade (Full Version):
https://www.moddb.com/mods/deus-ex-2-visible-upgrade
It's vital that during the installation process, you check the "Keep the unpatched game available" box to have the original .exe file for RenderDoc. This mod is useful as you can set higher resolutions and are less likely to have problems running the game on later systems as it fixes the CPU affinity problem. - Deus Ex: Invisible War ESRGAN Pack:
https://www.moddb.com/mods/deus-ex-invisible-war-esrgan-pack/addons/deus-ex-2-esrgan-textures-full-mod-v2
If you don’t already have the textures, or you don’t want to bother with extracting them from the game files yourself, you can download this texture pack. You don’t need to install it to your game, it is just useful to have because all of the images are uncompressed and don’t need extracting, so it makes it very easy to search for the textures you need by name in the file browser. For this guide, I simply needed to extract the zip, type in “Ava” in the search box within the folder, and I got all the textures that correspond with the mesh I was working with. - .DDS Plug-in
To edit the .dds textures and export them, you need a plugin to open the files. There are multiple plugins to use, depending on your preferred software (such as Photoshop or GIMP). The plug-in compatibility is also determined by your hardware, i.e. if you’re running on a NVIDIA or Intel GPU, etc. As such, it would be too complicated to post all the possible download links here. Please search for what version you need.


